

How To Make A Roof In Sketchup
Chapter 4. Cartoon a Bones Business firm
Information technology's time to apply the drawing techniques you've learned to a practical projection. In this affiliate, you lot'll build a house with an overhanging roof and a garage. You'll model the doors and windows and trim them out in realistic item. To complete the project, yous'll add a driveway and a forepart path.
Along the way, you'll add some new skills and techniques to your SketchUp toolkit. To kickoff with, you'll learn new techniques for coaxing inferences from the points, edges, and faces of your model. Equally of import, you'll learn how to lock your drawing tools and then they move just forth specific inferences and axes. Later you've mastered these techniques, you'll use them time and once more. They're one of the main reasons SketchUp artists are able to draw so quickly and accurately. You lot'll also learn how to use the Offset tool to speedily model new elements—like trim details—based on the outlines of existing objects like doors and windows. So hop in your pickup truck, and drive out to the construction site. It's time to start building.
Locking an Inference
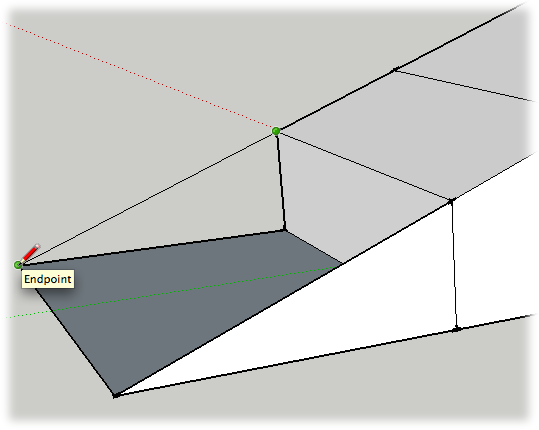
Chapter 3 introduced inferences (Finding 3-D Inferences)—handy lines that pop up from fourth dimension to time to bear witness you what SketchUp thinks you want to do. Inferences appear as temporary, dotted lines. They help y'all marshal your work to SketchUp's main axes or detect an edge'due south midpoint or endpoint (Effigy iv-i). You use these inferences every bit guides when you draw new lines and shapes. Letting SketchUp exercise the aligning and measuring for you makes your work go a lot faster.
Effigy four-1. As you move your cursor around your drawing, SketchUp displays inference lines. Apply these inference lines to measure and align the new parts of your model.
As you move a cartoon tool (like the Line tool) around in 3-D space, SketchUp works behind the scenes to figure out which inference you demand. When it sees a probable candidate, the program displays an inference line or highlights a item point. Inference lines ordinarily run from your cursor back to a bespeak that you might find helpful. When specific points are highlighted, you encounter a big colorful dot under the cursor. For example, when your cursor is over an edge, a green dot indicates an endpoint, and a blue dot indicates a midpoint. Normally, accompanying tooltip messages explain the inference.
In earlier exercises when yous saw an inference that yous needed, you moved your cursor slowly and advisedly, so yous didn't lose the inferences as you drew new shapes and lines. In this exercise, you learn how to lock an inference, so you can piece of work more quickly instead of making your mouse tightrope walk to use the inference.
-
With the rectangle tool, describe a 20 x 10-foot rectangle .
Draw the rectangle on the airplane formed by the red and greenish axes. The blue axis is perpendicular to the rectangle.
-
With the Push/Pull tool, pull the rectangle upwardly into a box .
Pull the box up so it's a skillful tiptop for a one-story business firm—about viii feet works well.
-
Click the Iso view button or cull Camera → Standard Views → Iso .
Yous meet an angled view of the box.
-
Click the box'south lower-left corner to start a line, and then move forth the green centrality, as shown in Figure iv-2 .
When you move your cursor along the green axis, you see a thin light-green line. If you happen to movement off the green axis, your cursor changes to a black line.
-
While the line is still light-green, printing and hold Shift to lock the inference in place .
When yous printing Shift, the thin green line changes to a thick green line, as shown in Figure iv-2. In one case you lock in the green inference, you can movement your cursor all over the drawing, and no affair where you move the cursor, the line yous're drawing is locked to the green axis.
Figure 4-ii. Inferences starting time appear as sparse lines. Printing Shift, and the inference changes to a thick line. With the inference locked, you're free to move your cursor anywhere in the cartoon, making it easy to grab a measurement from some other reference point.
-
With the Shift key withal down, click to finish the line .
The line is drawn parallel to the light-green centrality. SketchUp assumes you want to continue cartoon lines, so there'southward a rubber band line betwixt your cursor and the recently clicked point.
-
Position the cursor so that the safe band line is aligned with the carmine centrality .
When your line is parallel to the carmine axis, the rubber band line changes to a thin cherry-red line.
-
Press and hold Shift to lock the red inference line .
The thin scarlet line changes to a thick reddish line. Y'all can move the line cursor around your drawing to reference other points, edges, or faces.
-
Move the line cursor to the box's lower-right corner to reference that point .
When you move the cursor to the corner of the box, the line that you're cartoon extends forth the cerise centrality. SketchUp displays three signals when you move the cursor to the corner of the box—kind of like a basketball motorcoach waving wildly from the sidelines:
-
A light-green dot appears at the box's corner.
-
A new dotted inference line runs from the corner to the tip of the line you're cartoon.
-
A tooltip appears that reads, "Constrained on Line from Point." This is SketchUp'due south cryptic way of saying that you're using the corner signal every bit a reference for the new line.
-
-
With your cursor nevertheless referencing the corner point, click to complete the line along the red centrality .
A new line appears along the ruby-red axis. This line is parallel to the bottom edge of the box, and it's exactly the aforementioned length. Best of all, you didn't demand a carpenter'due south square or a record measure to describe it.
-
Draw the adjacent line to the corner bespeak on the box .
This line's a sure-fire, and it completes a rectangle that's attached to the box. At that place's no longer a rubber band line attached to the cursor, because SketchUp knows you've completed the shape. At present that you've congenital out, in the side by side steps you'll build up.
-
Click the new rectangle'south lower-left corner, and then begin to draw a line upwardly the bluish centrality .
When your line is on the blue centrality, the rubber ring line changes to a sparse blueish line (see Effigy iv-3).
-
Press and hold Shift to lock the blue inference .
The rubber ring line changes to a thick bluish line, and the line is locked to the blueish axis.
-
Move the line cursor to the top border of the box, and then click to complete the line .
Y'all can reference any bespeak on the elevation edge or face of the box to set the height of your line.
-
Continue by drawing a new line along the green axis back to the box .
This should only take one click, because SketchUp'south all set up for yous to draw another line. When y'all're done, a new face fills in.
-
Draw a new line along the bluish axis from the correct corner of your rectangle .
Use the same techniques (steps 12–14) to lock the inference and reference a point on the top of the box to set the height for your line.
-
Draw a horizontal line to the corner of the first box to complete the face of this new box .
Later you've fatigued the line, the confront fills in.
-
Complete your new box by drawing a line from height corner to top corner, every bit shown in Figure 4-4 .
Once this last line is drawn, the faces on elevation and to the right fill in. You lot've drawn a perfect, new box by using inferences from the start box.
Figure 4-3. When you're drawing a new line along the blue centrality. pressing Shift locks the inference to the blue axis. To brand the line exactly the height of the box, you lot tin reference any indicate along the top edge of the box.
Figure four-4. Drawing this terminal line from corner to corner will consummate the new box. With a click of the mouse, the terminal two faces fill in.
Working with Sloped Surfaces
Up to now, about of the exercises have concentrated on edges and faces that are parallel and perpendicular to each other. Most of the edges and faces take been aligned with one of the three main axes: crimson, greenish, or blue. However, the globe is filled with odd angles and sloped surfaces. And for good reason—a sloped surface is a groovy manner to keep rainwater off your roof. In this section, you lot learn how to create sloped surfaces and how to reference an existing sloped surface to create a second sloped face at exactly the same angle.
Follow these steps to create a sloped roof for the first box y'all created in this chapter:
-
Click the corner that's farthest to the back, then draw a short line along the bluish axis .
A new line extends above the top of the boxes. SketchUp is set up for you to draw another line.
Tip
Printing the upward arrow to forcefulness the line to the blue centrality, or wait until you see a tooltip that says "On Blue Axis", and then press and hold Shift. Pressing Shift locks your line to the bluish centrality.
-
Draw a line downwardly to the endpoint shared by the ii boxes to create a triangular shape at the forepart of the box .
The angle of a sloped roof begins to have shape. Use Figure 4-5 as a reference for this 2nd line.
-
Repeat steps 1 and 2 to create an identical triangle on the box'southward right side .
Every bit yous describe the vertical line forth the bluish axis, concord down the Shift central to lock the inference on the blue axis. And so move the cursor to the top of the beginning line as shown in Figure 4-v to fix the tiptop for the new line.
-
Depict a ridgeline that connects the tiptop betoken of each triangle .
Once the ridgeline is drawn, the back face and the sloped confront fill in, creating the new roof.
Referencing a Sloped Surface
The first box you lot drew now has a handsome sloped roof. Suppose you want to create a sloped roof for the 2d box that continues along the aforementioned bending. You tin describe this line the hard way, the inaccurate mode, or the easy way. The hard way is to pull out SketchUp'south protractor tool (see Using the Protractor Tool) and to create a guideline that you utilise to create the new roofline. Well, that's not too hard, but it takes unnecessary steps and clicks. The inaccurate way is to change to a side view and just endeavor to eyeball your roofline. You can get close, but information technology'due south unlikely you'll draw a truly accurate line. Creating your roofline the like shooting fish in a barrel style takes only two clicks and a hover. Here are the steps:
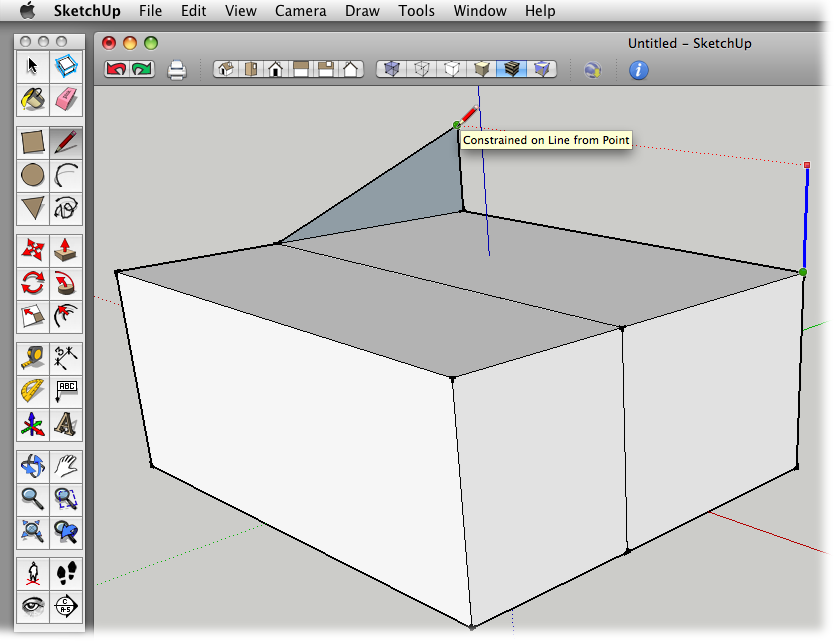
Figure four-5. Draw the 2nd vertical line using the click-motility-click method. Press and hold Shift to lock the line to the blue axis. Reference the peak of the first line (every bit shown here) to prepare the superlative of the second line.
-
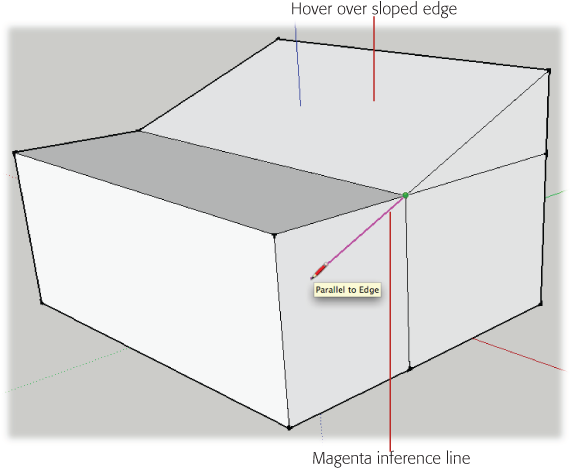
With the Line (50) tool, click the bespeak where your 2 boxes meet at the top .
A safety band line appears, fastened to the finish of the Line cursor on ane finish and to the corner point on the other.
-
Move the cursor over the sloping line above the first box and hover along the border .
Don't click or do anything else; yous're just expressing your interest in the angled line. SketchUp takes note when yous hover over an edge or confront.
-
Move your cursor to extend that line across the vertical face up of the second box, as shown in Figure 4-6 .
When the line is at about the same slope as the roof line, it changes to a magenta color. This inference shows that the slope of the new line is identical to the line you hovered over in step two. You can remember of magenta as the parallel inference color.
-
Press and concur Shift to lock the inference .
The thin magenta line turns into a thick magenta line. You can move your line cursor anywhere in the window, and the line stays locked to the roof'south slope. You lock the inference to the sloped line with the Shift key, just every bit you locked inferences that followed the main axes.
-
Click the box'due south right edge to finish the line .
Keep to hold Shift, and click any point along the right border to complete the line.
Effigy iv-half-dozen. Afterwards hovering over the edge of the sloped roof, the Line tool displays a magenta inference line that shows the continuation of the gradient. Press and hold Shift to lock in the inference and to consummate the line.
-
Employ the Push/Pull tool to remove the portion of the box above the roofline, as shown in Effigy 4-7 .
Start past clicking the upper triangle, and then click on the back edge of the box to reference the back face. When you click the dorsum face, the excess portion disappears equally it'due south pushed out of existence.
Information technology was easy to match the slope of the original roofline by using the magenta inference. You'd already drawn that 2nd box, and then it was simple to make up one's mind the endpoint for your new sloped roof. But what if you wanted to create a new 3-D shape by using that same gradient? Perhaps yous'd like to continue this roofline all the manner to the basis. SketchUp gives yous an easy manner to effigy out the dimensions of this new improver.
-
Click the business firm'south lesser corner, and so drag a line along the greenish axis .
When the line is oriented to the light-green axis, its color changes from black to light-green.
-
Press and hold Shift to lock the green inference line .
Belongings the Shift key locks the line to the green centrality and changes it to a thick green line. At present you can move the Line cursor to any indicate in the drawing window without changing the line's orientation.
-
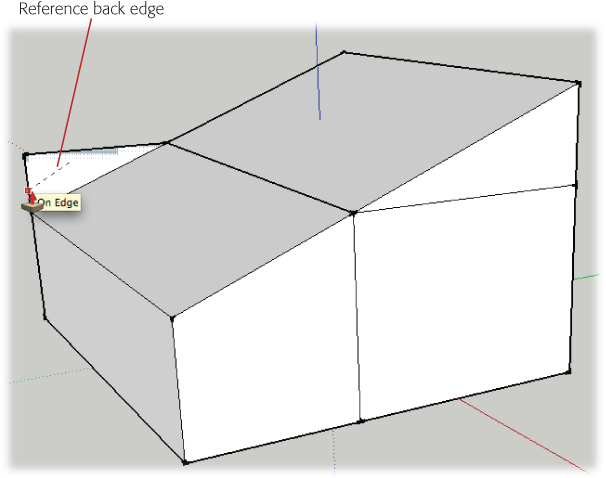
Motion the Line tool to the surface of the roof and and so click .
Make sure your cursor is over the face of the sloped roof (equally shown in Effigy iv-8). When yous click, SketchUp creates a line that'due south the perfect length to extend the slope of the roof to the basis.
Effigy iv-7. Subsequently creating the new gradient line for the second roof, use the Push/Pull tool to push away the excess portion. Click and get-go your push, and then click the dorsum edge of the box to remove the section entirely.
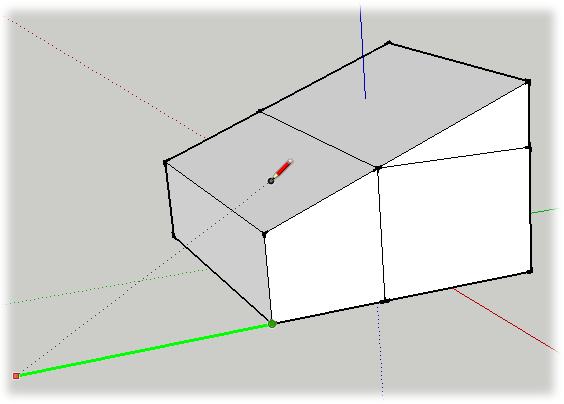
Figure 4-viii. By referencing the gradient of the roof, yous can describe a line exactly the right length to extend the roof to the ground. To reference the slope, make sure your tool is over the face of the roof (as shown here), not over ane of its edges.
-
Click the corner of the roofline to consummate the new triangle .
If you want to examine the new triangle y'all created, use the Orbit (O) tool. Inspection shows that information technology's a perfect extension of the other rooflines.
-
Depict a line along the scarlet axis, using the dorsum of the box as a reference point .
Employ Shift to lock this new line to the red axis, so click the house'south dorsum edge to determine its length.
-
Draw a line to connect to the bottom of the box .
SketchUp is ready to draw a new line, and so all y'all take to do is click the corner.
-
Describe a sloping line to complete the back triangle and enclose the new three-D shape .
When yous draw the last line (Figure 4-9), the peak face forming the roof fills in, and the new add-on is complete.
Effigy 4-9. When you lot depict the terminal line, the last two faces of the new add-on fill in.
Yet Some other Way to Reference a Slope
By now you're probably confident that as long every bit yous take a sloped edge or face to reference, you lot can create a matching slope for any circumstance. That'south true, but for the sake of complete disclosure, here'southward 1 more than example. If you lot're following along doing the examples in SketchUp, employ the Eraser tool to remove the add-on you congenital in the last case. (For a tip on erasing several edges at once, see the box on the adjacent folio.)
In the previous example, you saw how to extend a line to just the right length to continue the slope of the roof. You lot can besides utilize an inference to create a vertical line that's just the right superlative to continue the roof. As shown in Effigy four-10, the method is almost exactly the same. Click to showtime cartoon a vertical line. When the line is blue, indicating it's aligned with the blue axis, press and hold Shift to lock in the inference. So you tin movement your cursor to reference any point, edge, or face up in your model. Move the cursor over the face of the sloped roof and then click; SketchUp references the slope of the roof and creates a vertical line of exactly the correct height. Finish up by drawing an edge that connects the height points.
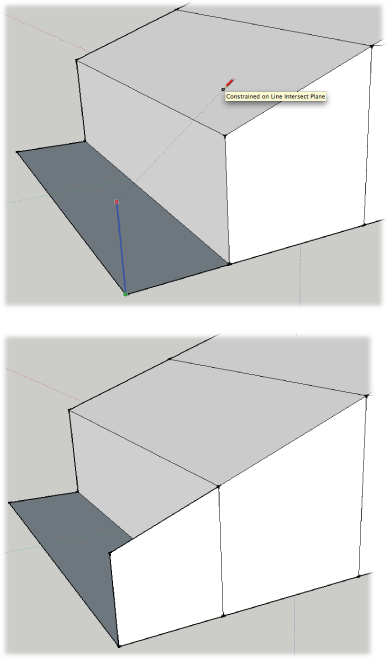
Figure 4-10. Top: To create a vertical line that's exactly the right summit to go on the roofline, press and hold Shift to lock the inference for the blue centrality. Then click the face of the roof to reference the gradient. Bottom: Afterwards you draw the vertical, connect the height points for a perfect continuation of the roofline.
Inference Locking with the Movement Tool
Inference locking works with all of the cartoon tools, including those that draw lines and shapes. It as well works with the tools that modify existing objects, such as the Motility tool. To get a feeling for inference locking with the Move tool, outset with a box like the one in Effigy iv-11. Brand sure the box has simply half dozen faces. If you're using a model from the previous practise, remove any extra shared edges.
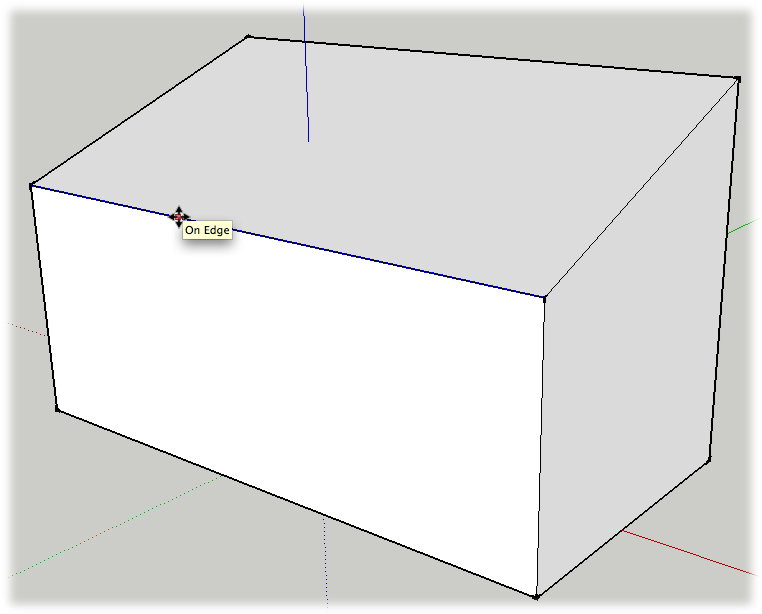
Figure 4-11. This box has a sloped roof. Using the Move tool and inference locking, you lot tin can even the sides.
-
With the Move (M) tool, click the superlative edge of the curt side of the box .
The entire edge is highlighted, and the edge moves as you move the cursor.
-
Motility the edge up, along the blue centrality .
When the edge is moving along the blue axis, you see a blue dotted line and a tooltip that says "On Blue Axis".
-
Press and hold Shift to lock the motility along the blueish axis .
When you press and hold Shift, the dotted line becomes thicker, and movement is constrained to the blueish axis. You tin can motion the cursor to whatever point in the cartoon surface area, and the edge continues to move forth the blueish axis.
-
Move the cursor to the contrary edge, and click to reference the height of the opposite wall .
When your Move cursor is over the opposite edge of the box, a tooltip appears saying "Constrained on Line Intersect Plane", as shown in Figure 4-12. This message is SketchUp's cryptic way of telling you that you're referencing the height of the contrary edge.
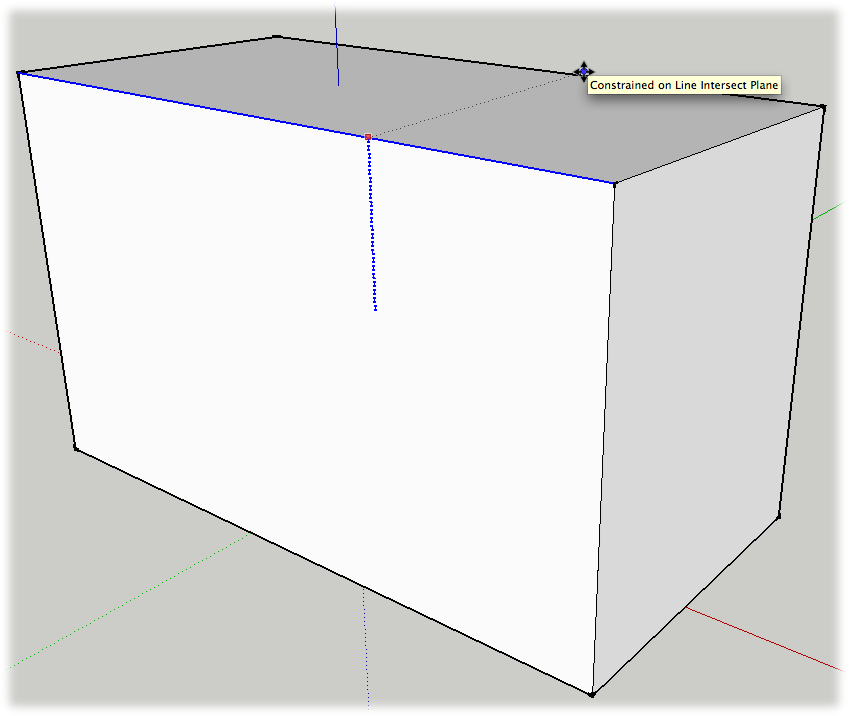
Figure 4-12. You can apply the Shift-cardinal inference locking technique with many of SketchUp's tools. Here the Move tool is moving a top edge while it'due south locked into the blue axis. The contrary face up of the box is referenced to create walls (faces) of equal top.
If you want to experiment some more than using the Move tool, effort this exercise. You can utilize the box from the previous exercise, or create a new box similar to the i in Figure iv-13. Discover the midpoint along one of the long edges, and draw a line from midpoint to midpoint, dividing the peak of the box into two halves. Doing that divides the long edges into ii parts, where each office has its own midpoint. Divide the 2 parts once more, so that the top of your box looks like Effigy iv-13.
Employ the Move (M) tool to pull up one of the lines to create a peaked roofline. When the movement is along the blue axis, you see a blueish dotted line and a tooltip message that says "On Bluish Axis". Press and agree Shift to lock the movement to that centrality. Click to complete the movement and the reshaping of the roofline. Side by side click one of the other lines in the roof, equally shown in Figure 4-xiv. Pull it upwards in the same manner, locking information technology to the blue centrality. And so move your cursor over to the first ridgeline and click. This creates two roof ridges of exactly the same meridian.
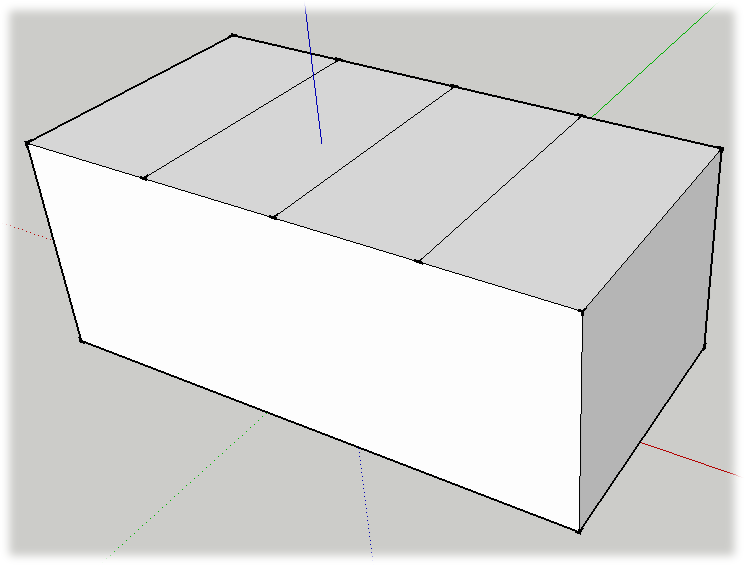
Figure 4-13. The top of this box was divided into 4 parts. First, it was divided in half by drawing a line from midpoint to midpoint. So each new section was divided in the same manner, from midpoint to midpoint.
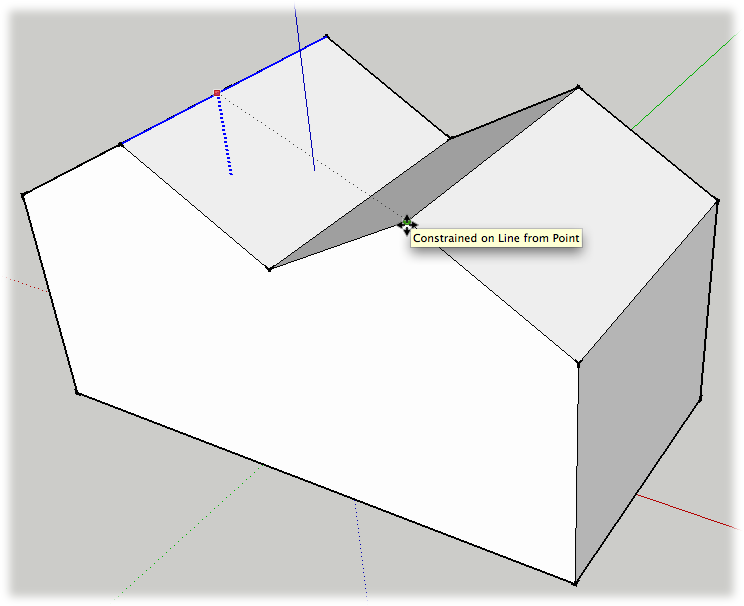
Figure iv-xiv. As yous pull the 2nd roof ridge along the bluish axis, concord down the Shift key to lock in the inference. And so reference the first ridge line to prepare the pinnacle of the edge.
Yous can use inference locking as you move an unabridged face and all its edges. For example, click one of the middle roof faces. Begin to move the face forth the blue axis, and lock the inference by holding Shift. Once the inference is locked, reference the contrary sloping face, as shown in Effigy 4-15. Click the face up, and you create a tall roof with a single, off-centre ridgeline.
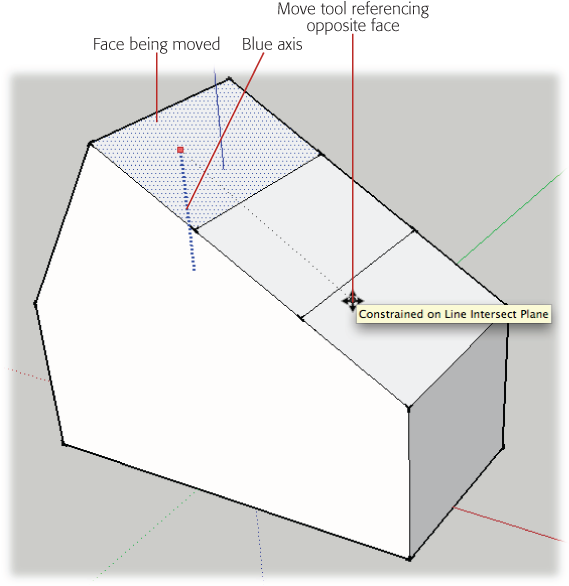
Figure four-15. You can change the orientation of an entire face past using the Move tool and inference locking. Here the roof changes from two ridgelines and four sloping surfaces to a single ridgeline with ii sloping surfaces.
Using Inference Locking with Shape Tools
If you've followed all the exercises in this chapter, you're probably a pro at locking inferences and referencing points, edges, and faces in your model. All that practise will come in handy as you lot work in SketchUp. This last example shows yous how you tin utilize references from one object, such equally a house, to align shapes and faces that are completely unattached to that object. Again, this power comes from a combination of inference locking and SketchUp's click-move-click drawing method.
Start with a model that has a couple of sloped surfaces, like the house model from the previous exercises. Select one of the shape tools, similar the Circle or Polygon tool. Notice that when you concur the shape tool over ane of the surfaces of the house, the tool automatically orients itself to the surface underneath. Move to a unlike surface, and the tool snaps to that orientation. Movement the tool to one of the sloped roof surfaces, and then press and hold Shift. Move the tool away from that surface, and then click-motility-click to draw the shape in mid-air, abroad from the house model. When you lot're done, information technology should look something like Effigy 4-xvi. The shape should be oriented to the same gradient as the roof. Utilize the Orbit (O) tool to maneuver around and meet the shape from different angles. If you lot want some more exercise, describe shapes with the Rectangle and Polygon tools that are aligned to some of the other surfaces of the house.
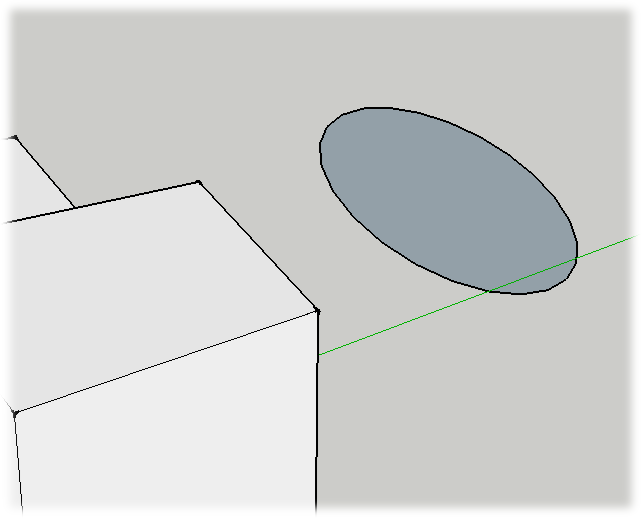
Figure 4-sixteen. You tin use inference locking with the shape tools, similar Circle (C), Polygon (P), and Rectangle (R). Hover over a surface to reference the orientation; then press Shift and move to a new position in the drawing surface area. Still holding Shift, draw your new shape.
Making Doors and Windows
When you lot're building a house in the existent globe, you lot spend a lot of time measuring and aligning the different elements. You may want to align several windows so they're at the same height. Perhaps you'd like to position a garage door so information technology's perfectly centered underneath the eaves. In the real earth, that takes a lot of quality fourth dimension with your record measure. In SketchUp you lot tin take reward of computer-assisted shortcuts, virtually importantly, that erstwhile friend the inference.
For this exercise, start with a house-shaped box that looks like the one in Figure 4-17. Y'all create and position openings for doors and windows. Later you'll create framing and trim for these features.
-
With the Rectangle (R) tool, describe a front door on the house .
Position the door to the left of the midpoint, as shown in Figure four-18. For this exercise, information technology'due south fine to eyeball the dimensions. Merely drag out a rectangle that appears to be a reasonable size.
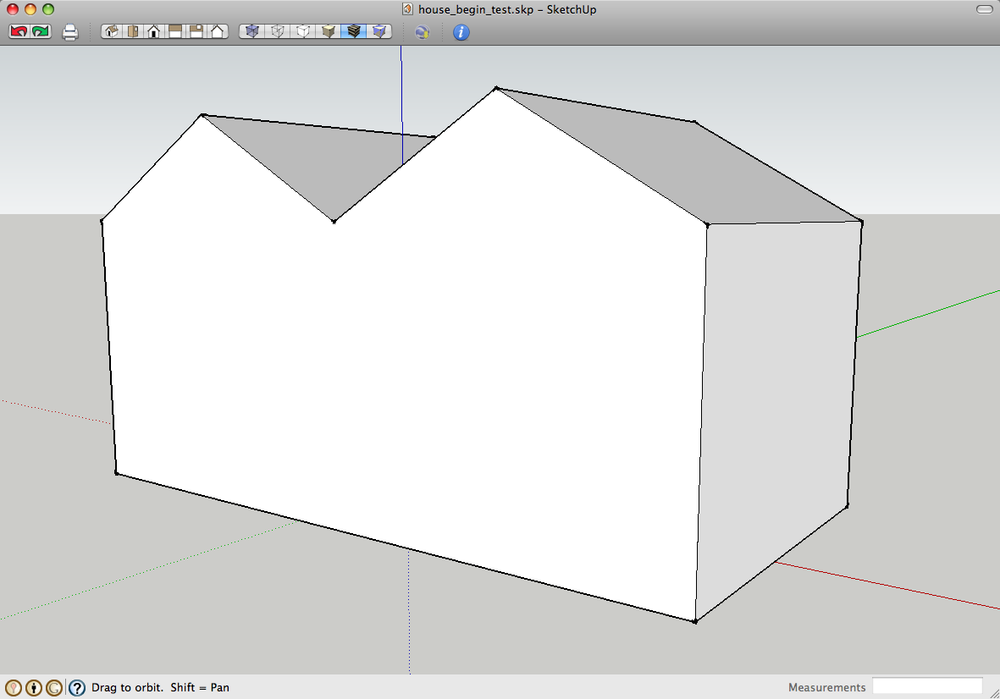
Figure iv-17. If you don't have a business firm model from the previous exercises, yous can download house_begin.skp from the Missing CD page at http://missingmanuals.com/cds.
-
Hover over the door'south upper-right corner, and so move horizontally to the right .
When you see a tooltip that says "Endpoint", move the cursor to the right. As you move the cursor horizontally, you should run across a dotted inference line—if not, attempt moving up or downwards but a smidgen.
-
Press and hold Shift to lock the inference .
The thin, dotted inference line becomes a thick, dotted inference line.
-
Click-move-click to draw a window, with the summit edge the same tiptop as the door .
Your window tin exist foursquare as is the one shown in Figure iv-eighteen, or it can exist rectangular. SketchUp displays a tooltip message when a rectangle is a square or a golden section.
-
On the left side of your house, draw a large rectangle for a garage door .
You can identify the garage door anywhere along the left side of the building. You'll position it precisely in the following steps.
-
With the Select tool, click the garage door .
After you preselect the garage door, the face and edges show highlights.
-
Choose the Move (M) tool and click the midpoint at the top of the garage door .
After yous click the midpoint, the garage door moves with the cursor. It's constrained to moving along the face of the wall.
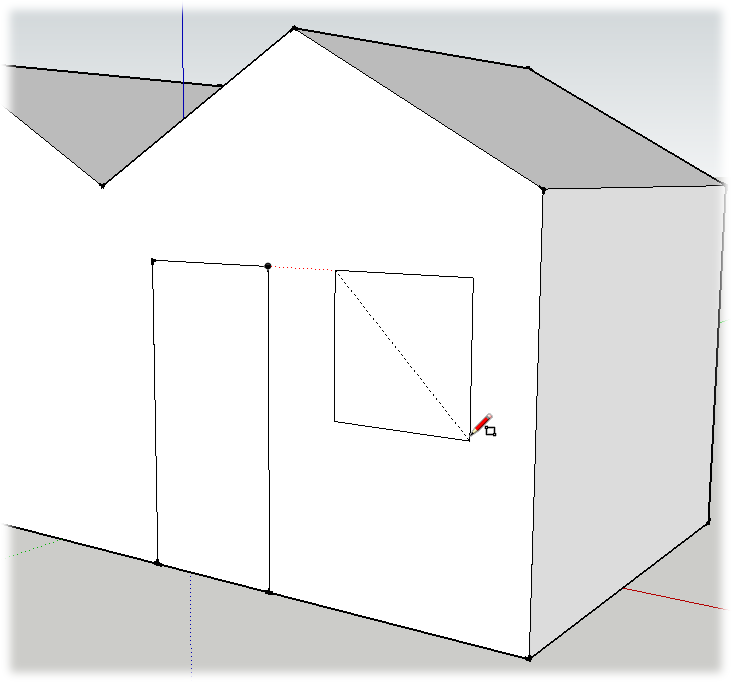
Figure four-18. Hover over the superlative corner of the doorway, then slowly move the Rectangle tool horizontally. An inference line helps y'all to draw the window at the same height as the door.
-
Printing and hold Shift, and and then move the cursor to betoken at the peak of the garage, every bit shown in Figure four-19 .
The garage door moves horizontally as you move the cursor.
-
Click to end the movement .
The garage door is centered below the peak of the roof.
The world is total of symmetry—both natural and human made. This fact was not lost on SketchUp's software engineers; they created the handy First tool and so you tin can hands re-create and use the existing shapes and edges in your drawing. The Offset tool is in the toolbar, near the Move and Push/Pull tools, or you tin can cull Tools → Showtime. For some tips and details about using the Starting time tool, see the box on the side by side page. In this next exercise, you'll trim out the window and doors of your firm model. Trim out is a carpenter's term for applying forest trim effectually something like a door or window. Trim hides the seams and provides a more finished look.
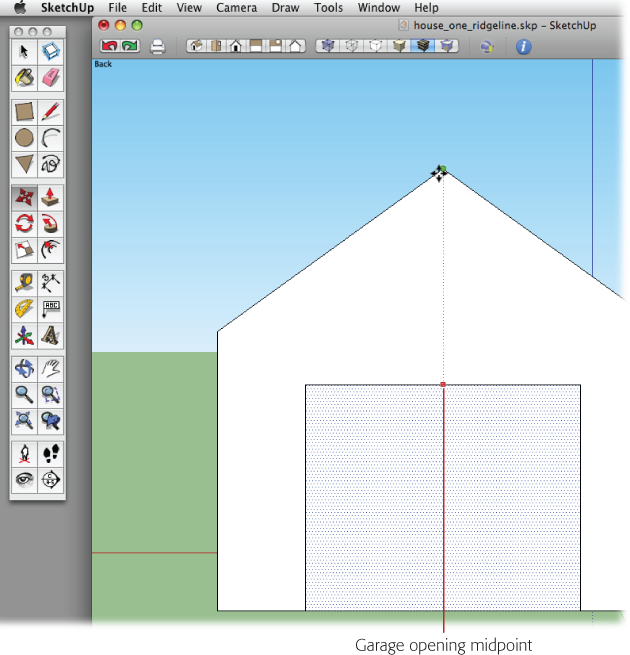
Figure 4-19. Past using the Movement (One thousand) tool and an inference line, yous tin can align elements like this garage door to other parts of your model, like the peak of the roof.
For the purposes of learning SketchUp, the trim out procedure provides a great introduction to the Starting time tool. Earlier you use the Offset tool, make sure nothing in your model is selected by pressing Ctrl+T (Shift-⌘-A).

Figure 4-20. This 2-D design that looks similar a target was created past drawing a 3-inch circle so repeatedly creating a new edge using the Offset tool.
-
Select the Offset tool and then move the cursor over unlike parts of your house model .
As you movement the cursor around your model, auto-selection kicks into activity. Dissimilar faces are highlighted and a ruby square snaps to different edges. The foursquare marks the target of the start operation.
-
Click in one case while the red square is on the border of the window .
The square locks in place on the edge. At present every bit you motion the cursor, you see another rectangle that indicates the shape to be created by the outset. Drag the cursor abroad from the opening to create an start on the outside of the window opening, or drag it toward the center of the opening to create an showtime inside. As you drag, the offset distance is displayed in the Measurements toolbar, as shown in Effigy 4-21. If you desire to be precise, you can type a value in the Measurements toolbar.
-
Move the cursor toward the heart of the window, and when you're happy with the size of the window trim, click in one case .
A new rectangle appears within the original window opening.
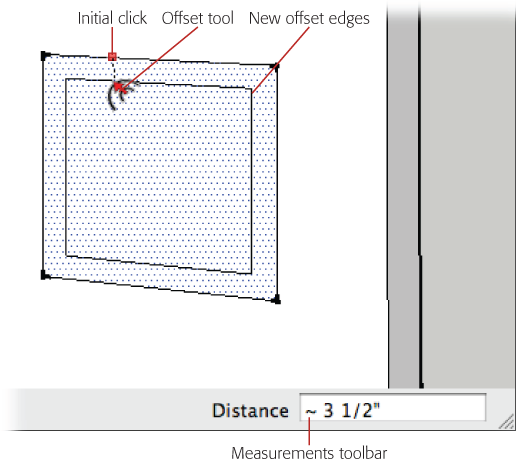
Figure 4-21. The red highlight marks the edge or edges being duplicated in the beginning action. Hither the inner rectangle shows where the new edges will announced. The Measurements toolbar gives you an idea of the dimensions of the offset.
-
Double-click the edge of the inner rectangle .
The Offset tool creates another rectangle within of the window with the aforementioned offset distance.
-
Utilize the Push/Pull tool to push back the "glass" at the center. And so push back the frame near half that altitude. Finally, pull out the trim so that information technology's most an inch or two in front of the surface of the house .
Suit these features to taste for now. If you desire, you lot can enter precise values in the Measurements toolbar.
Tip
When you're creating the trim and window frame details with the Push/Pull tool, it helps to modify the camera view then you see the details from a slight bending. That makes it easier to approximate the distance betwixt the surfaces.
At this bespeak the window trim looks pretty good. You've got an inset window frame and an outset window trim. For many buildings, the window and door trim are similar if not identical. When y'all look at the door, it'southward easy to run across that it would look practiced with the same trim around the sides and acme, but you don't actually want trim on the bottom, where the door meets the flooring. This calls for a footling preselection before you use the commencement.
-
With the Select (infinite bar) tool, preselect both sides and the meridian of the door opening .
Click 1 edge and and then hold down the Ctrl (⌘ on a Mac) key. The arrow cursor displays a + sign to signal that y'all can add elements to the pick. Click the other two edges to select them.
-
Change to the Kickoff (F) tool, then click the acme edge of the door .
Because you preselected the edges of the door, the Start tool automatically snaps to one of the three selected edges. Fifty-fifty if you lot hover over other parts of your drawing, it doesn't change the selection.
When y'all click the top edge of the door, y'all see new showtime lines for the 3 edges in the selection.
-
Move the cursor over to the within corner of the window trim .
With the selection locked in, you can move your cursor anywhere in the drawing window. In this case, you use the window trim as a reference to create the door trim.
-
When you come across a tooltip that says "Endpoint" (every bit shown in Figure iv-22), click the corner .
SketchUp creates an first for the door trim that's similar to window trim. The three edges that were originally selected are yet selected, making information technology easy to repeat the process to create the door frame.
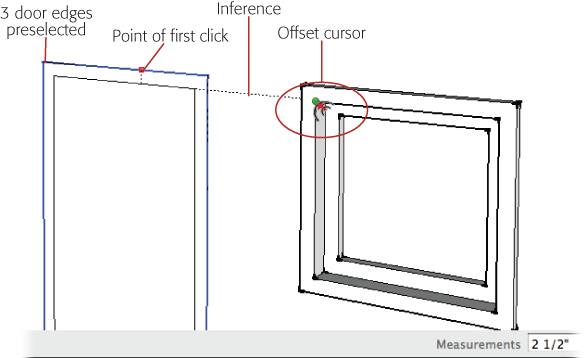
Figure 4-22. You lot can utilize inference locking with the First tool. Only hold the Shift key downward, and and then reference some other indicate in your model. Hither the dimensions of the window trim are used as a reference for creating the door trim.
-
Again click the door's acme edge .
The Showtime tool goes into action, one time once again displaying new edges as you move the cursor.
-
This time, motility the cursor to reference the inside edge of the window frame and and so click .
Another set of three lines appears, giving you an edge for the door frame.
-
Printing P to select Button/Pull, and then click the door opening .
After clicking, the face up of the door moves back and forth as y'all move the cursor effectually the drawing area.
-
Click the window opening .
When you click the window opening, Push/Pull uses that as a reference for the door and sets the door at the aforementioned depth in the wall.
-
Click the door frame, and then click the window frame .
The door frame is the next department moving from the eye to the outside of the door. Yous set up its depth by referencing the window frame.
-
Click the door trim, and and then click the window trim .
The final clicks set the door trim so that it stands out from the wall the same distance equally the window trim. Where you're done, your trimmed out door and window should look like Figure 4-23.
For consistency, you lot probably want to add trim to the opening for the garage door; however, it doesn't need an inset frame like the front end door and window. You can trim out the garage door using the same technique you used for the front door. Preselect the two sides and the pinnacle edge, and so click the top with the Starting time tool.
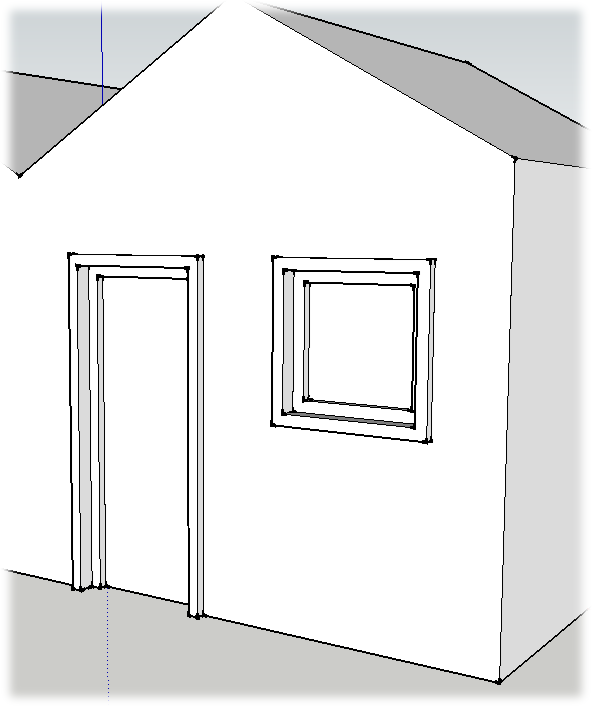
Figure 4-23. By using inferences along with the Commencement and Push/Pull tools, y'all can chop-chop trim out your doors and windows.
Utilise the front door trim to size the trim for the garage door. You can use Push/Pull to set up the garage door back in the wall, and then employ information technology to pull the trim out from the wall surface.
Building a Roof with an Overhang
Equally you lot add details your model begins to look less like a modified shoebox and more like a real house. Another detail that's important for real houses is a roof with an overhang. The body of the roof holds beams and rafters that support the roof, and the overhang protects the walls and siding from sun and weather. In the real globe the laws of gravity and nature seem to have more outcome than they do in SketchUp.
In this adjacent exercise, yous use the Kickoff tool to create a profile for your new roof, and then you use Push/Pull to give information technology shape. The first step is to modify the overall contour of the roof using the Move tool.
-
Click the roof's left ridgeline, and motility information technology downwards in along the blue axis .
When you motion the ridgeline along the blue centrality, yous see a dotted blue line and a tooltip bulletin that says "On Blue Axis".
-
When you see the "On Blue Axis" tooltip, press and hold Shift .
The Shift cardinal locks the movement of the edge to the blue axis.
-
Click the house'southward left edge .
The roof flattens, eliminating the ridgeline.
-
Erase the shared edge .
You no longer need the shared border that divides the ridgeline; remove it now so it won't interfere with other parts of the model.
-
Movement the outside edge downwardly just a bit .
Creating a slight gradient hither helps drain moisture and gives the building a bit of character, every bit shown in Figure iv-24.
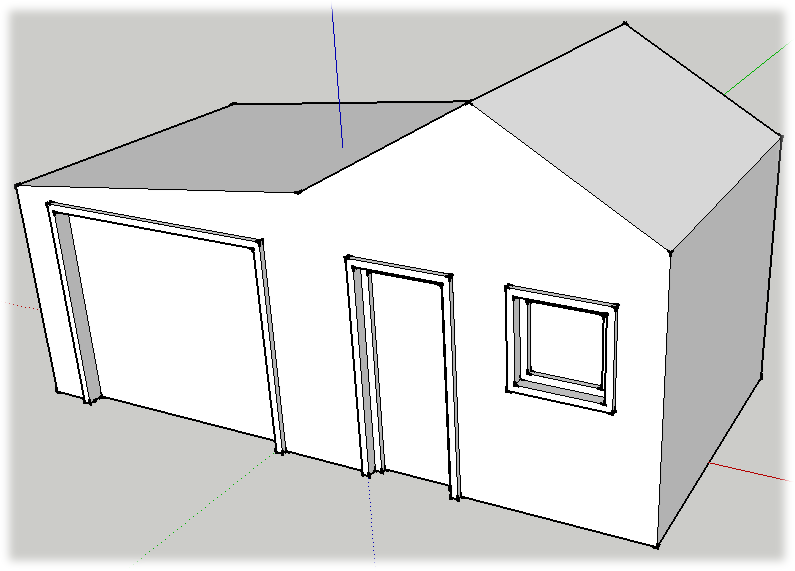
Figure four-24. When you arrange the roof line, make sure in that location'southward enough room between the roof and the garage door.
-
At the front of the house, select the edges that ascertain the roof's contour .
Your choice should include 3 lines at the summit of the house.
-
Use the Offset tool to offset the edges up .
You can eyeball this offset, or blazon dimensions. Something between 6 and 8 inches is appropriate for a roof.
-
With the Line (50) tool, connect the edges between the original lines and the new lines created by the starting time, every bit shown in Figure 4-25 .
Y'all shut this new shape by drawing a line on each end. Once the shape is airtight, the confront fills in.
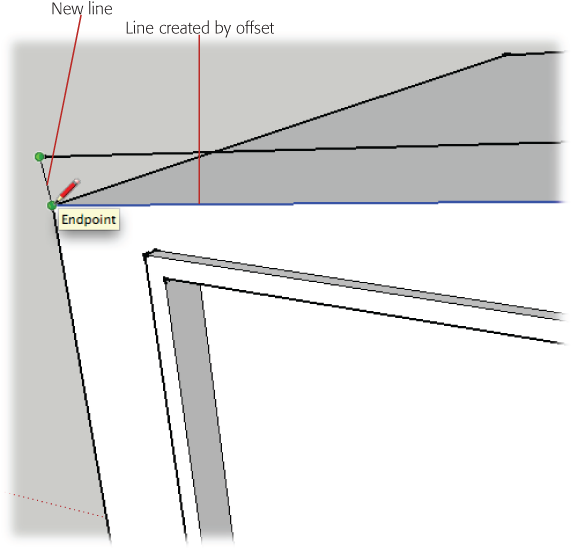
Effigy 4-25. Draw a line on each stop of the roof to connect the original edges with the new edges created by the Offset tool. Once the shape is enclosed, a new face appears between the edges.
-
Choose Push button/Pull (P), and then push the new outline of the roof back to encompass the rest of the firm .
Click the new surface once with Button/Pull, and then push information technology to the back of the building. You can reference one of the dorsum edges to temporarily align the roof with the dorsum of the edifice.
-
Pull out the overhang on the forepart .
Click the front confront over again, and begin to pull the confront forward to create an overhang. A 9- or ten-inch overhang works well, only you tin apply any dimension you want.
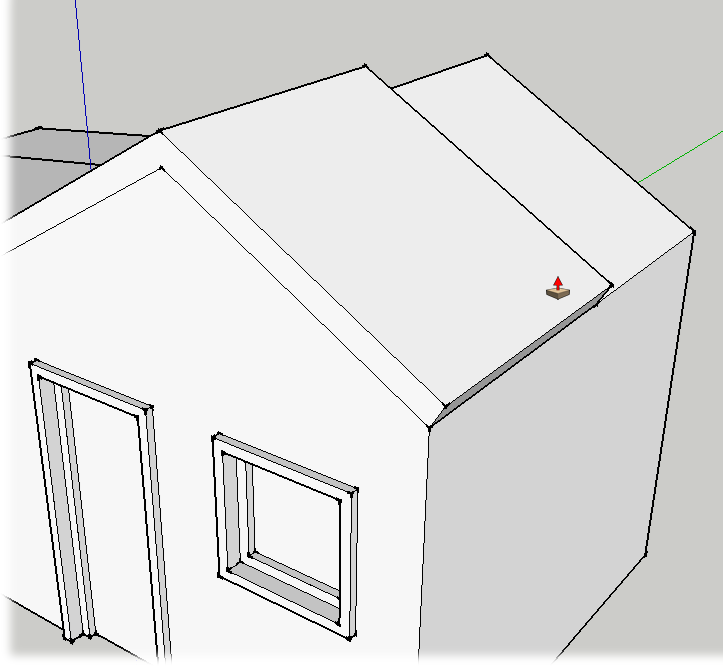
Figure 4-26. Once the front face is complete, use Push button/Pull to extend the new roof to the dorsum wall of the building.
-
Pull out the overhang on the sides and the back .
The overhang should exist the aforementioned on all sides of the building. Use the Measurements toolbar to accurately create overhangs of equal dimensions. Later you've pulled out all the overhangs, you lot may find that the process leaves some inapplicable lines.
Note
You lot tin can't merely double-click to repeat the overhang distance. This is due to SketchUp's interior (white) and exterior (blue) face problems. For more details, see Double-Clicking with Push/Pull.
-
Change your view then you lot can see the bottom of the overhang, and and so erase the actress lines .
As shown in Figure 4-27, delete the shared edges that separate faces on the same aeroplane. Don't delete the edges where the roof changes angle; that also erases the faces.
-
Orbit (O) around the place and admire your construction skills .
Unless you've gone off on a creative tangent, your model looks something like the business firm in Figure 4-28. Yous'll take care of the initial landscaping in the next few steps.
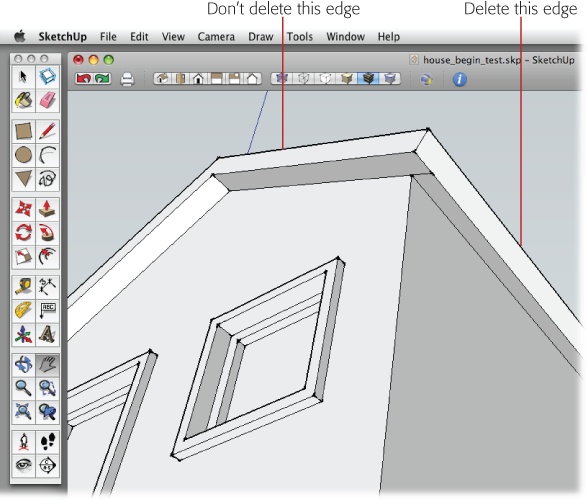
Figure 4-27. Delete the extra shared edges that you detect under the eaves. If you accidentally erase 1 of the wrong lines and the adjacent faces, use your trusty Undo fundamental (Ctrl+Z or ⌘-Z).
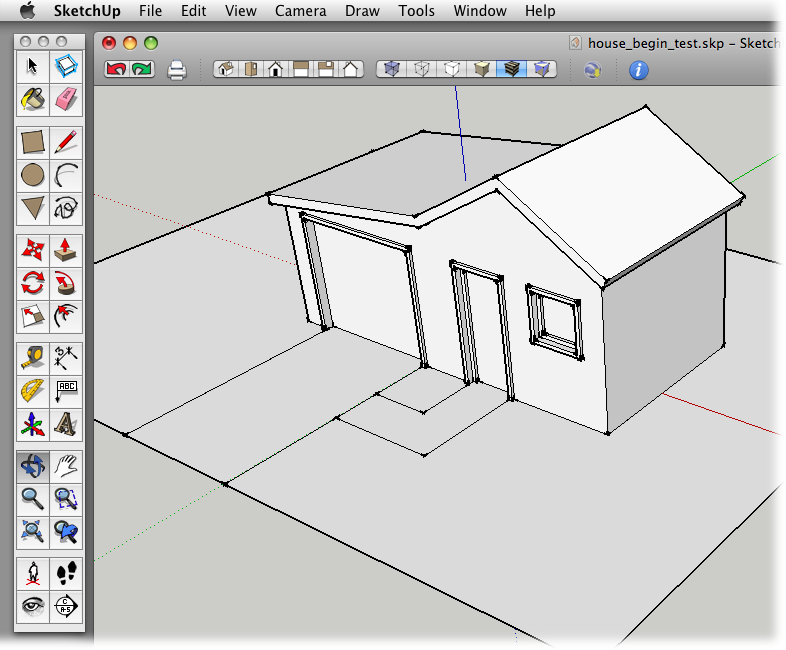
Effigy 4-28. It'southward not exactly a McMansion—just a small-scale house for a modest SketchUp neighborhood. In the next affiliate, you bring in the landscape architects to dress it up.
Initial Landscaping: Front Walk and Driveway
Y'all'll do some more all-encompassing landscaping in the next chapter, but for now you can give your house a plot of world and a couple of basic paths for cars and people. These basic features are created using the Rectangle and Line tools. You desire to draw these elements at the ground level, so it's best to modify to the acme view before yous begin. Once you've drawn the outline of the yard at ground level, the other shapes and paths volition align to that surface.
-
Change to the Height view .
This gives you lot a bird'due south eye view of your estate. You may want to zoom out a little and then there's room around the firm to create a yard. Press Z to change to the Zoom tool, and then elevate to change the view.
-
With the Rectangle (R) tool, click-motion-click to draw a rectangle around the house to represent the yard .
Give yourself enough room for the kids and dog to play. And who knows, some twenty-four hour period you lot may want to add together a pool.
-
Correct-click (or Control-click) the face of the new yard, and choose Contrary Faces from the shortcut menu .
Because it's a two-dimensional shape, information technology's more than probable that your rectangular k is displaying the blue face that indicates an interior. Reversing faces changes its color to white.
-
Select the Line tool, and then depict ii lines to create a drive from the garage to the edge of the g .
Utilize Effigy 4-28 as a reference for placing the edges of the driveway. It'due south easiest just to click the point where the garage door frame meets the yard.
-
Employ the Line tool to create the left border of an Fifty-shaped path from the door to the driveway .
Click the point where the front door meets the 1000, and draw a brusk line toward the street. And then create another line segment that turns to the driveway, shown in Figure 4-29.
-
Choose the Select (space bar) tool, and then select the two lines that mark the edge of the path .
When they're selected, the sparse black lines become thick blueish lines.
-
With the Commencement (O) tool, click the selected lines, and then click the other corner where the front end door meets the yard .
Your walkway has two edges and is the same width as the firm'south doorway.
-
Save your model with the proper noun house_finished.skp/ .
Not bad for a day's construction. Y'all can use this model in the next chapter, where you tackle contend building and learn about the joys of SketchUp components.
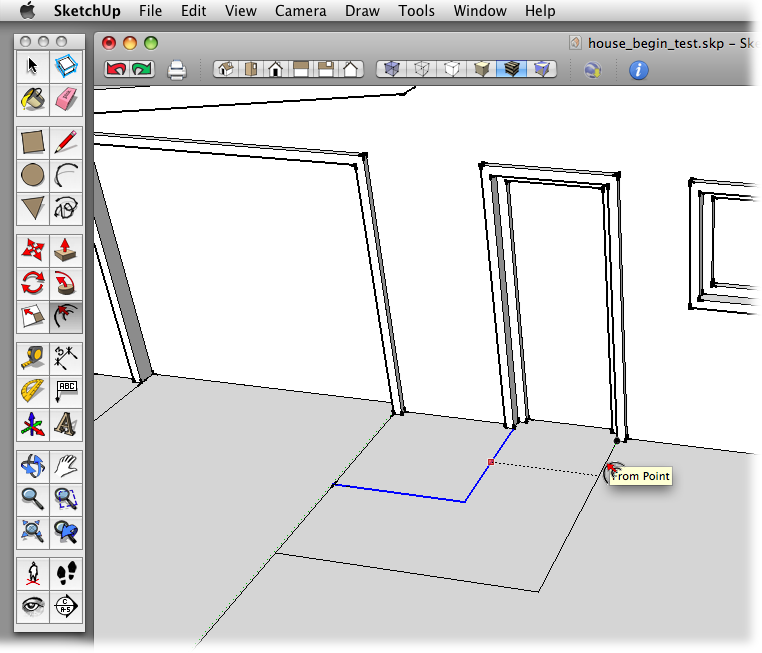
Figure 4-29. Apply the Offset tool to create a second edge for the walkway from the front door to the driveway.
Source: https://www.oreilly.com/library/view/google-sketchup-the/9780596804060/ch04.html
0 Response to "How To Make A Roof In Sketchup"
Post a Comment